Testing code correctness, user interface#
Testing code correctness#
When developing larger codebases that involve several people, the need for automated testing of code correctness arises. This means that in addition to the code that produces a certain result, we also define test functions; the latter check whether the former return the expected result.
A simple example is:
## contents of the file test_first.py (folder modules)
def square(x):
    return x**2 + 1 # obvious bug relative to the function name

def test_square():
    assert square(2) == 4
If we run the function test_square(), the correctness of square(2) == 4 is tested; if the result is True, nothing happens, but if the result is False, an AssertionError() is raised (see the documentation for the assert statement). Since the function square() returns x**2+1, the test will fail.
You are probably wondering what the point of such correctness testing is. As code grows large and many people work on it, it inevitably also becomes interconnected. This makes it possible for a developer to add new functionality and unintentionally break existing functionality. If all functionalities are tested, the testing will detect the inadequacy of the proposed change.
Most packages include such correctness testing; as an example, you can look at the source code of the NumPy package, which is hosted on GitHub; if you look at the contents of the numpy.linalg submodule for linear algebra:
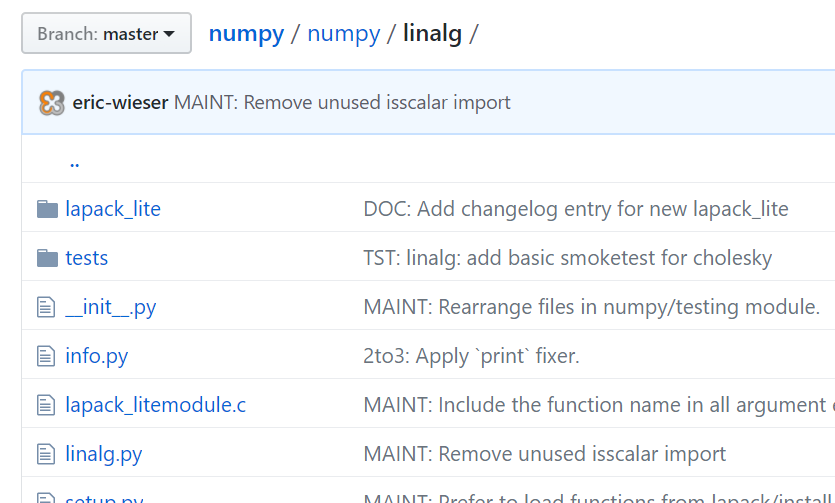
we notice the subfolder tests. The latter is entirely dedicated to testing and contains a multitude of Python files that verify the correctness of the submodule.
There are several options for testing code; the following are commonly used:
All three approaches have similar functionality. Recently, however, pytest is most commonly used (e.g., NumPy/SciPy), whose basics we will look at here.
pytest#
We install the pytest module with the pip command.
Some of its features:
it returns a description of the test that failed,
automatic discovery of test modules and functions,
it can include
unittestandnosetests.
If you run pytest in the command line, the program will automatically search the current folder and all subfolders for files of the form test_*.py or *_test.py (advanced discovery is described in the documentation).
If we run the command in the command line:
pytest
we get a report like this:
============================= test session starts =============================
platform win32 -- Python 3.6.2, pytest-3.2.1, py-1.4.34, pluggy-0.4.0
rootdir: c:\pypinm\modules, inifile:
collected 4 items

test_tools.py ...
test_first.py F

================================== FAILURES ===================================
________________________________ test_square _________________________________

    def test_square():
>       assert square(2) == 4
E       assert 5 == 4
E        +  where 5 = square(2)

test_first.py:5: AssertionError
===================== 1 failed, 3 passed in 0.65 seconds ======================
From the report we see that the program found two files (test_tools.py and test_first.py) and that an error occurred in one function (test_square), while three functions successfully passed the test.
For basic use in numerical computations, we should also highlight the numpy.testing module (documentation), which provides support for testing numerical arrays.
Selected functions are:
assert_allclose(actual, desired[, rtol, ...])(documentation) checks equality to a required accuracy,assert_array_less(x, y[, err_msg, verbose])(documentation) checks whether the elements ofxare less than the elements ofy,assert_string_equal(actual, desired)(documentation) checks string equality.
Example: test_tools.py:#
In the file test_tools.py, functions for testing the tools.py module are prepared.
First the data is prepared:
initial = np.asarray([[1, 2, 3],
                      [4, 5, 6],
                      [7, 8, 9]])
swapped_cols_0_1 = np.asarray([[2, 1, 3],
                               [5, 4, 6],
                               [8, 7, 9]])
Then a function is defined that calls the function tools.swap_columns() and compares the result to the expected swapped_cols_0_1:
def test_column():
    a = initial.copy() # make a copy of the data
    b = tools.swap_columns(a, 0, 1) # b (and also a) have their columns swapped
    np.testing.assert_allclose(b, swapped_cols_0_1)
If the function tools.swap_columns() works correctly, calling pytest in the command line completes successfully. For the remaining tests, see the file test_tools.py and the documentation of the pytest package.
Graphical user interface#
A user interface is used for the user’s interaction with the program code. User interfaces can be command-line based or graphical. For simple command-line user interfaces, it is best to use argparse; otherwise, here we will focus primarily on the graphical user interface.
Graphical user interface inside the browser#
Recently, a lot of effort has gone into supporting the development of graphical interfaces within the Jupyter notebook or Jupyter lab environment. The main advantage of this approach is that upgrading it into a web application is relatively straightforward; see, e.g.: Dashboarding with Jupyter Notebooks, Voila and Widgets | SciPy 2019 | M. Breddels and M. Renou.
Graphical user interface within the operating system#
In this section we will look at classic user interfaces that we run within a particular operating system. For programming a graphical user interface, too, there are many different approaches/modules. A few of the most commonly used:
PyQt is based on Qt, which is the most widespread platform for user interfaces,
PySide is similar to PyQt, but with a broader LGPL license, though unfortunately also with poorer support (here is a good book: PySide GUI Application Development - SE),
Kivy for rapid development of modern user interfaces (not as mature as, e.g., Qt),
wxWidgets a widely used free platform for building user interfaces.
Among all those listed, we will take a closer look at PyQt, which is probably the best and also the most mature choice (for commercial use, however, it is unfortunately not free).
It is worth mentioning that a user interface can be:
drawn with QtDesigner (see the video), or
coded.
Here we will code the user interface.
Example#
First we import the package for interaction and for graphical objects:
from PyQt6 import QtCore     # for interaction
from PyQt6 import QtWidgets  # graphical objects
We will also need the sys module for running the program:
import sys
We typically build a user interface on the class QtWidgets.QMainWindow (documentation), which has the structure shown below:
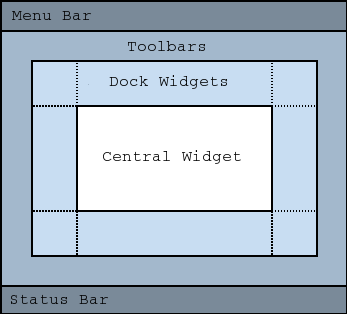
The essential graphical elements used in such a user interface are:
Menu Bar,
Toolbars,
Dock Widgets,
Central Widget,
Status bar.
It is not necessary to define all of them; below we will look at an example in which we define the Status bar, Central Widget, and Menu Bar. We usually define all elements when initializing an instance of the class (the __init__ method).
Here we point out that the graphical interface is based on so-called Widgets (e.g., for a button, a table, a date, etc.). A demonstration of some of the options is shown in:
A very simple user interface (with inline code comments) is shown below.
import sys
from PyQt6 import QtCore
from PyQt6 import QtGui
from PyQt6 import QtWidgets

class MainWindow(QtWidgets.QMainWindow):
    """ The main window inherits from `QtWidgets.QMainWindow`
    """

    def __init__(self):
        """ Constructor of the MainWindow object
        """
        QtWidgets.QMainWindow.__init__(self) # parent constructor
        self.setWindowTitle('Program title window')

        # status bar
        self.my_status_bar = QtWidgets.QStatusBar() # new widget
        self.my_status_bar.showMessage('This text disappears after 10s', 10000)
        self.setStatusBar(self.my_status_bar) # here self.my_status_bar is assigned to the one prepared in QMainWindow

        # central widget
        self.button1 = QtWidgets.QPushButton('Button 1') # Button labeled 'Button 1'
        self.button1.pressed.connect(self.action_on_button1_press) # connect the press to the action function
        self.setCentralWidget(self.button1) # add the button to the `CentralWidget`

        # menus
        self.my_exit_action = QtGui.QAction('&Exit',
                                             self, shortcut=QtGui.QKeySequence.StandardKey.Close,
                                             statusTip="Exit the program",
                                             triggered=self.close)
        self.my_file_menu = self.menuBar().addMenu('&File') # menu 'File'
        self.my_file_menu.addAction(self.my_exit_action) # link to the action `self.my_exit_action` defined above

    def action_on_button1_press(self):
        QtWidgets.QMessageBox.about(self,
                                'Title :)',
                                'This is triggered when the button is pressed.')
We then run the program inside a try statement:
try:
    app = QtWidgets.QApplication(sys.argv)
    mainWindow = MainWindow()
    mainWindow.show()
    app.exec()
    sys.exit(0)
except SystemExit:
    print('Closing window.')
except:
    print(sys.exc_info())
This plugin does not support propagateSizeHints()
For a more advanced example, see the files:
A few comments on user_interface.py:
Look at the override of the
mouseDoubleClickEventevent and override the inheritedkeyPressEventevent so that pressing any key closes the program (if you are in a TextEdit field, then pressing a key will of course print the value of that key).Add another Widget from the list.
Modify the program so that the sine function is always plotted, and in the
function_textinput field you will enter the number of discrete points (currently there are 100 points). Connect the field to the appropriate functions.Set up error handling for the change above.
A few review questions!#
In VisualStudioCode, create a module that has two functions:
for multiplying a matrix and a vector,
for multiplying two matrices.
For the module above, create a script for testing (use
numpy.testing).In
user_interface_simple.py, in the initialization method__init__, comment out all calls to theself.init ...methods except for the methodself.init_status_bar(). Run the program in normal mode. Set a break point onself.setGeometry(50, 50, 600, 400)and run the program in debug mode.Continue from the previous point and find the shortcut for stepping through lines:
stepping over a line,
stepping into a line.
Step into
init_status_bar(self)and stop at the lineself.setStatusBar(self.status_bar). Open the console and, via the command line, change the value ofself.status_bar.showMessage().Uncomment the lines commented out earlier (above). Add a third button that closes the program.
Add another Widget from the list.